Getting Started (iOS)
If you've just installed our TheatreSound app - Thanks! - but you may be wondering where to start. The app provides a simple interface for cuing sounds during a performance or 'Show' and has many useful features developed from our experience of doing just that. The app uses sounds stored in your media library (via iTunes), so there might be a small investment of time required getting your various sounds, effects and music into iTunes, but let's just start at the beginning ...
A blank sheet
The first page you will see is an empty show set. This is where you will create new shows and run the performance. To create a new show tap the '+ Add Show' bar at the top of the empty table.
![]()
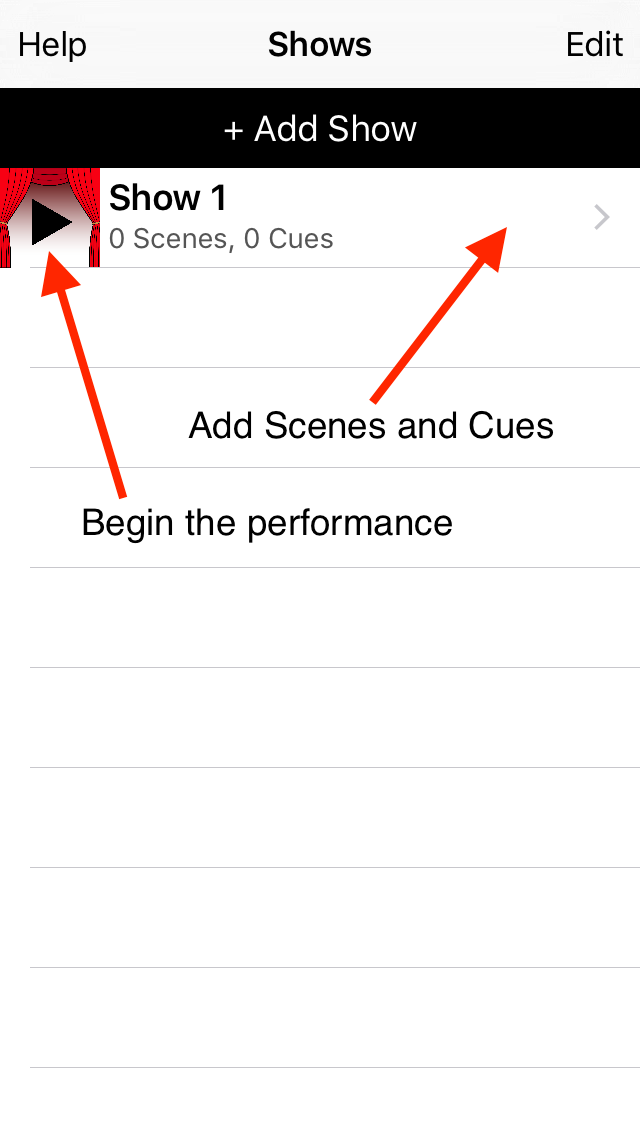
The titles of the shows can be edited by tapping the 'Edit' button at the top-right corner of the navigation bar and then tapping on the title, which brings up the keyboard display. You can also reorder your Shows by dragging to the new positions. Tap 'Done' when you are finished.
For every show you create you can tap the icon on the left to start the performance, or tap the name to add and edit its Scenes and Cues. Each new Show is empty, so you need to create at least one Scene, and then add Cues to the Scene. Let's add some scenes ...
Adding Scenes
Tap the name 'Show 1' to move to the Scenes table.
![]()
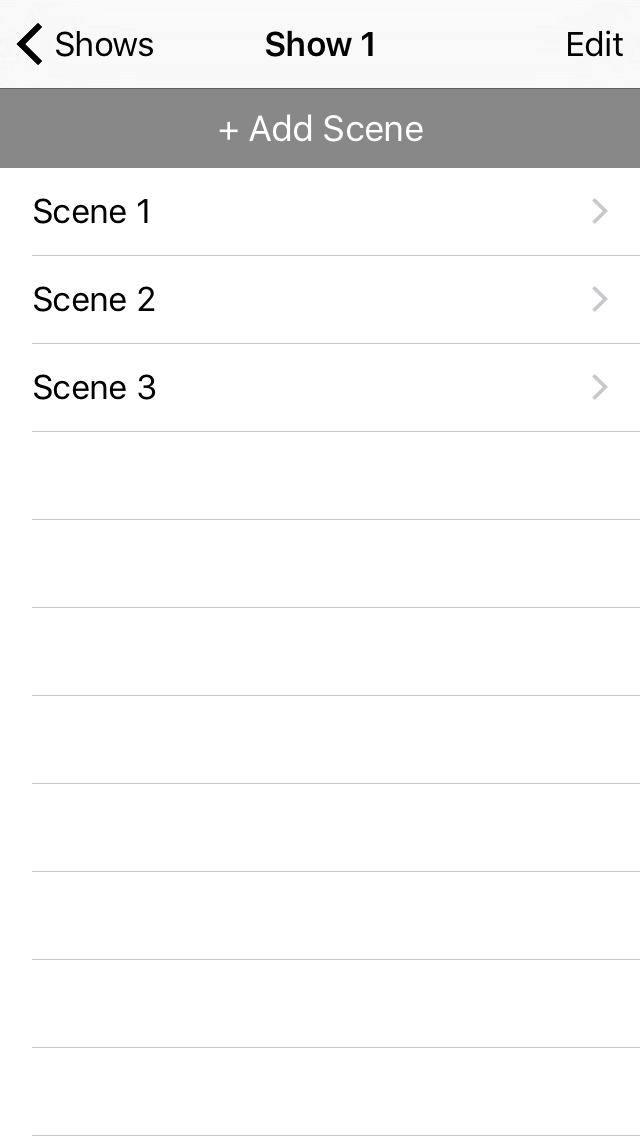
To create a Scene tap the '+ Add Scene' bar at the top of the table. Tap three times to create three new scenes. Note you can edit the names and reorder Scenes via the 'Edit' button in the top-right corner, tapping 'Done' once you have made your changes. Our show is still empty at the moment, so we now need to add some Cues to at least one scene ...
Adding Cues
To create Cues tap the name of a scene. Be sure to close Edit mode, otherwise you'll just edit the scene name. You'll see two action bars at the top: '+ Empty Cue' and '+ iTunes Cues'.
![]()

An 'Empty Cue' inserts 'Silence', which can be used as a placeholder, or to create a pause in the sound during a show. An 'iTunes Cue' allows you to pick one or more sounds/songs from your iTunes library. You can select multiple song/sounds and insert multiple instances of a song/sound by tapping its name more than once from the media selection screen. Each sound/song will be added as an individual Cue.
Cues names can be edited and reordered using the 'Edit' button in the top-right corner.
Every Cue has a set of properties that determine how it will behave during the show. These settings can be accessed in two ways - from this Cues table by tapping the name of the Cue, and also directly from the Performance Screen (see below). Here's what you can change:
Cue Properties
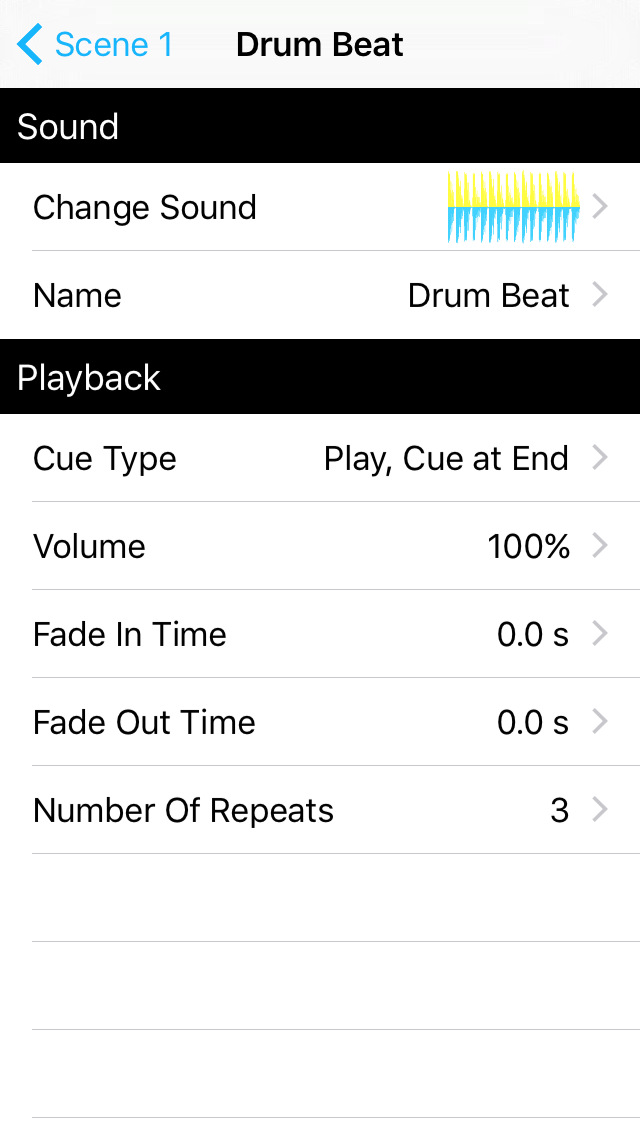

Name: Any name you choose to give this Cue.
Cue Type: Determines the looping behaviour:
- Loop until Cue - keeps playing the song/sound over and over until it is cued, at which point it immediately transitions to the next cue
- Play, Cue at Fadout - plays the song/sound one or more times (as set by the value of Number of Repeats); automatically transitions to the next cue as soon as the fadeout begins
- Loop until Cue, Play to End - keeps playing the song/sound over and over until it is cued, at which point it plays to the end and then transitions to the next cue and begins fading out
- Play, Cue at End - plays the song/sound one or more times (as set by the value of Number of Repeats); automatically transitions when it finishes playing
Volume: Set the desired playback volume; it can be adjusted during the performance if necessary.
Fade In Time: The number of seconds it takes to fade in once cued; it can be adjusted during the performance if necessary.
Fade Out Time: The number of seconds it takes to fade out once the next Cue is activated; it can be adjusted during the performance if necessary.
Number of Repeats: This option is only available for fixed-repeat types; this is generally set to the default value of 0 (no repeats), but you can set it to any number between 0 and 15. If you want to repeat more than this you'll have to create another Cue with the same song/sound and repeat this as well.
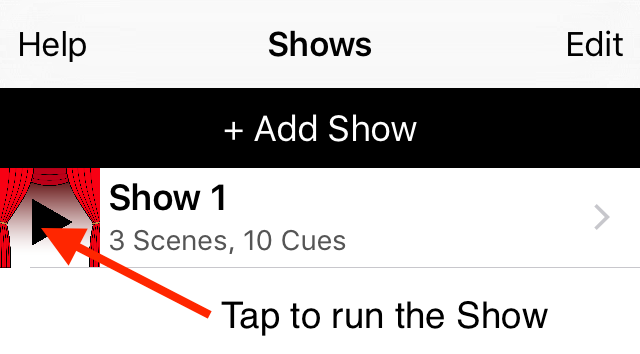
Now there are some sounds to play let's begin a performance ...
Running a Show
Use the back navigation (top left) to return to the Shows table. This time tap the performance button for your show.
Performance View
The Performance view lays out each Cue horizontally. All sound Cues are laid out in the same way. (You can scroll the image below horizontally in the the same way you can in the app.)

Cue Layout
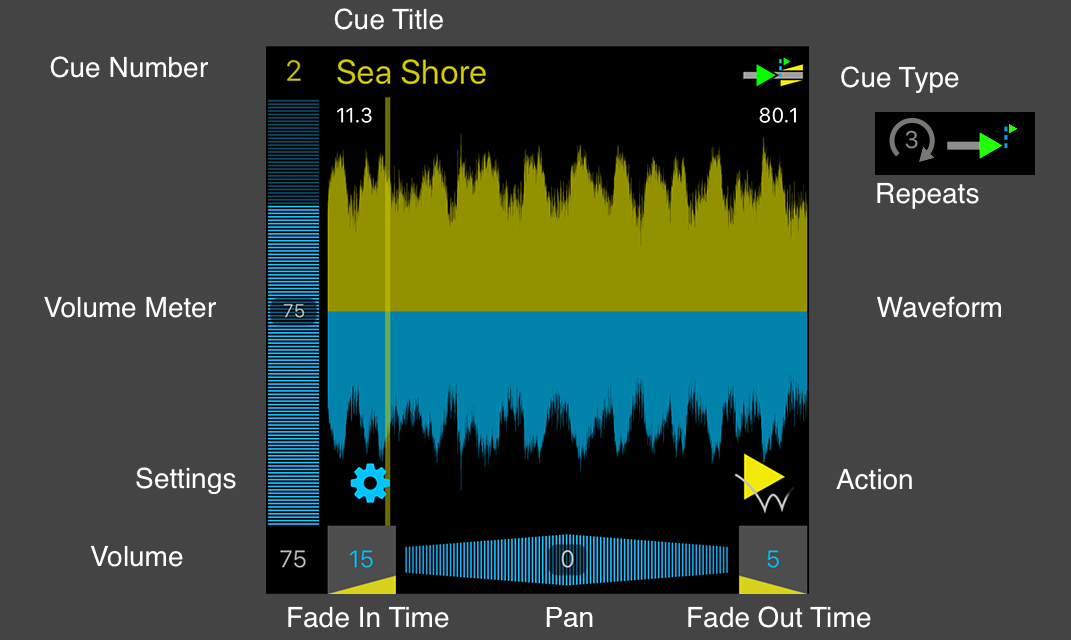
The display elements include:
- Cue Number, the position of the Cue within the Show
- Volume, the numerical value of the playback volume (100 = full volume)
- Repeats, only available for non-looping Cues, shows the number of times the sound will be repeated before ending
Active elements include the:
- Fade In Time, seconds of fade from zero to the volume set by the Volume Meter;
- Fade Out Time, seconds of fade from the playback volume to zero, when the element is Cued
- Volume Meter, by tapping from the bottom to the top of the meter you can adjust the playback volume
- Cue Type, tap this to toggle between the different types
- Cue Title, an arbitrary name given to the Cue
- Settings, click this to display the Cue properties page
- Waveform, showing the average audio signal over the duration of the loop. Tapping the waveform performs different actions depending on the context as indicated by the Action Label(s).
The following Actions are available before the Show is started:
- Double-tap to play the sound - allows the sound to be previewed quickly
- Double-tap to stop the sound - stops the sound preview
These actions are available once the once the Performance has started:
- Tap to Cue - tap to initiate the transition to the next sound during a Performance
- Tap Back - allows the playback to revert to the previous Cue during a Performance
- Tap to Force Transition - where a sound has been set to autoCue, this will force the transition immediately
- Double-tap to stop the sound - stops the Show immediately
TIP: The grey tick or 'w' on these icons indicates the need to single or double-tap the waveform to perform the indicated function.
TIP: The whole of the Waveform acts as the sensitive tap area - you don't have to tap just where the icon is. Sometimes there are two icons in the Waveform - usually single-tap cue and a double-tap stop. Both work within the entire area of the Waveform display.
TIP: Tapping the Waveform during preview will skip playback to the position tapped.
Starting the Show
Once your cues are ready you can begin the show by tapping at the very top of the Performance View - where is says: 'Tap here to start "Show 1" (hold for 3s to dismiss)'. The first sound will be started and faded in if its Fade In Time is greater than 0. What happens after that depends on the various settings, but in principle you simply trigger the next sound by tapping the current Cue, or else, if the current Cue is set to play for a specific number of times, it will trigger the next Cue automatically.
Starting from somehwere in the middle of the Show
When rehearsing, you will often want to dip in and out of the Performance, so you need a way to begin from the middle. When a Show is stopped, the new Performance will always start again at the beginning. But if you tap a Cue (when it is not being played) before running the Show, the Show will start from there instead. You will also see the text at the top of the screen change from: 'Tap here to start "Show 1" (hold for 3s to dismiss)' to something like 'Tap here to start "Show 1" from Cue 7 (hold for 3s to dismiss)' - underline added for clarity here only.
Closing the Performance View
If you're wondering how to close the Performance View, you simply hold your finger down (without moving it) on the Performance View for more than 3 seconds. This triggers an alert asking if you want to close the Show. This is a deliberately non-trivial process so the Performance doesn't get stopped by accident and the the alert is not triggered accidentally during a crucial cue transition!