Getting Started (MacOS)
If this is your first time using TheatreSound app, firstly, thanks for choosing our software to manage your show! However, you might be wondering where to start. This app provides a simple yet powerful interface for cuing sounds during a performance or 'Show' and has many intuitive features developed from our experience of doing just that.
The app can load sounds stored anywhere on your device, including your media library, and can be in any of the typical musical formats, e.g. mp3, wav, aif, m4a, but let's just start at the beginning ...
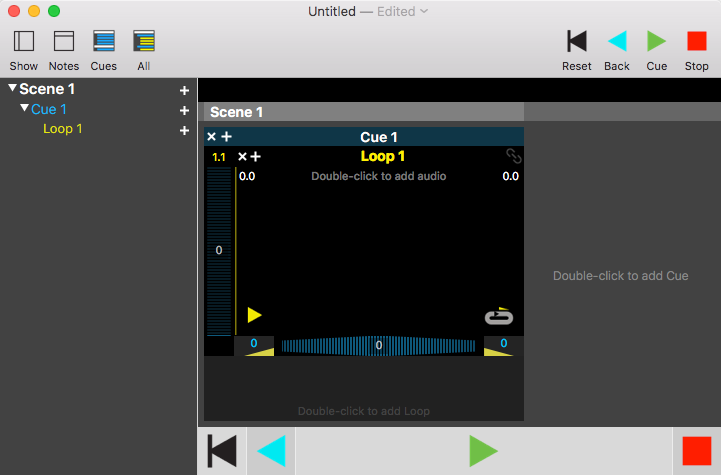
An empty, untitled document
Each show is stored as a TheatreSound document, so you can save your shows and come back to them later. If you can't see a new window use File > New from the menu. An empty show includes the bare minimum: a single Scene with a single Cue, containing one Loop. Until you load something else, the Loop will just contain 'Silence' - a loop of no sound.

Running the show is as simple as clicking on a green 'Cue' arrow, (there is one at the bottom of the screen, and another in the toolbar). Alternatively, you can tap the spacebar when the app has the focus. In it's empty state, one 'Cue' would start the show, and begin the silent loop looping. A second 'Cue' will bring the show to an end.
That's all pretty basic, so let's put some flesh on these bones.
Add some audio
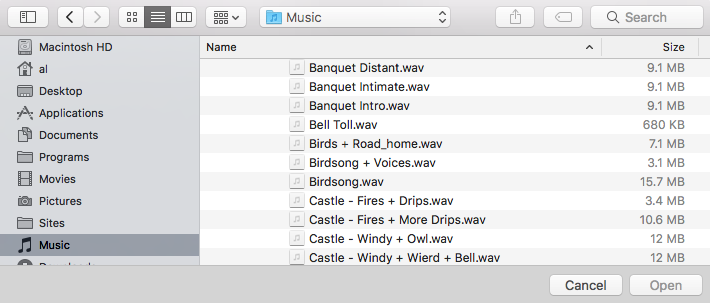
Double-click on the silent loop. This will bring up the Open File dialog, so select an audio clip from your computer. Select an audio file and click 'Open'

Loop detail
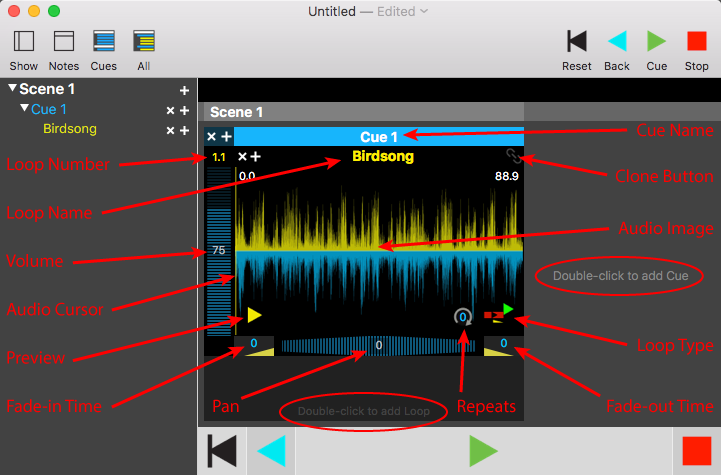
Once your file has loaded, the Loop Window will show a graph of the average signal over the duration of the audio. Here are some of the main features of the Loop Window and what they all represent.

The display elements include:
- Loop Number, the coordinates of the Cue within the Show in the format <Cue Number>.<Loop Number>
- Audio Cursor, shows the progress of audio playback
Active elements include the:
- Cue Name, an arbitrary name given to the Cue. If you leave this as 'Cue <Number>' it will be automatically corrected if you reorder the cues
- Loop Name, an arbitrary name given to the Loop. When you load the first audio file, it will be set to a clean version of the file name
- Volume Meter, click anywhere in the volume meter to adjust the playback volume
- Preview, when the show is not running you can click this to preview the audio, including any fades
- Fade-in Time, seconds of fade from zero to the volume set by the Volume Meter
- Pan Control, click anywhere in the pan control to adjust the position of the audio
- Repeats, only available for non-looping Loop Types, and sets the number of times the sound will be repeated before ending (0 = no repeats, i.e. play once, 1 = one repeat, i.e. play twice, etc.)
- Fade-out Time, seconds of fade from the playback volume to zero, when the element is Cued
- Loop Type, click this to toggle between the different types. (See Loops Types for more information on how each of these behave.)
- Audio Image, showing the average audio signal over the duration of the loop. Stereo sounds show the left channel in yellow above the line and the right channel in blue below the line. When 'previewing' you can click the waveform to adjust the playback progress. Double-clicking triggers the Open File dialog to choose a different audio file.
Double-click zones:
- Loop Audio, double-click the Audio Image to load up a new audio file
- Add Loop, double-click below the bottom Loop, within a Cue to add a new Loop to that Cue
- Add Cue, double-click anywhere to the right of the last Cue to add a new Cue to the last Scene
Add more cues and audio
Use the double-click area to the right of the last Cue to add a few more Cues, so you have at least five Cues.
Use the double-click area at the bottom of some of the Cues to add more Loops to those Cues.
Try selecting different Loop Types for each Loop and enter some values for fades, adjust the volume and pan settings, then test the results using the yellow Preview button ![]() .
.
Test the show
Press the show Stop button at the bottom of the screen to stop any playing Loops ![]() .
.
Press the Reset button at the bottom of the screen to bring the selected Cue back to the start of the show ![]() .
.
Now begin the show by pressing the green Cue button  .
.
You can trigger the next Cue, (if it hasn't been automatically cued), by clicking the Cue button again.
Try reversing a Cue using the Back button ![]() .
.
Rearrange the show
Use the Navigator Panel to the left of the screen to reorder the show, by dragging and dropping items to their new location.
Create some notes
Use the Notes Panel, just above the Scene labels to create some notes for a few Cues. You need to select a Cue and then type something in the Notes Panel. These notes will appear every time the Cue is selected or cued in a show.
Save the show
Use File > Save... to save your show for another time, or the cmd-S keyboard shortcut.
You're done!
Click on the Topics page to find out more about specific features of the TheatreSound app, or delve in the Tips and FAQ.
Related Topics
- Topics - help on various common topics and tasks.
- Tips & Frequently Asked Questions - dive into the nitty-gritty or find out about some of the more advanced features.
